You can find lists of new materials on our website's "New Arrivals" page!
Thank you for your patience as the Library works diligently to reinstate Link+. The Link+ vendor has informed us that service will resume by October 31, 2019.
We know how valuable Link+ is for our patrons. One alternative for patrons during the temporary suspension of Link+ service is to use Link+ through a variety of other Library systems, including the Alameda County Library. Click here for the list of Link+ Member Libraries.
Account Summary
To login click My Account in the upper right hand corner of the Online Catalog screen using the 14 digit barcode on your library card and your last name. After you login to My Account, you can view your Account Summary. Account Summary contains links to your account information and lets you quickly see the status of your account, including any immediate issues on your account.

To access Account Summary log in with your library credentials.
When you have logged in your name appears in the upper right hand corner of the catalog. Click your name and then choose from the following options:
Contact Information - Change Contact Info
Create EZ Login - Set Up EZ Login
EZ Username - Change EZ Username
EZ Password - Change EZ Password
Opt-In & Notifications - Update Opt-In and Notification Options
Account Activity
Account Activity links your current loans, holds and fines.
To login click My Account in the upper right hand corner of the Online Catalog screen using the 14 digit barcode on your library card and your last name. After you login to My Account, you can view your Account Activity. Account Activity contains links to your account information and lets you quickly see the status of your account, including any immediate issues on your account.
To access Account Activity from Account Summary, log in with your library credentials.
When you have logged in your name appears in the upper right hand corner of the catalog. Click your name and then Click Account Activity (See below):

After logging into Your Account, you can access this option by clicking Account Activity from the Account drop-down option.
These options are found in Account Activity:
Loans - View (current or overdues), renew, rate, review, or print
Holds - View, cancel, suspend, re-activate, rate, review, or print
Fines - View, pay, or print
Loan History - View, rate, review, or print
Purchase Suggestions- View titles you have suggested for purchase
See also Saved Lists and Saved Searches for other Account options.
Create EZ Login
Create an EZ Login to make logging in easy to remember. You may choose any EZ Username and EZ Password you like, and may change it at any time.
First, login by clicking My Account in the upper right hand corner of the Online Catalog screen using the 14 digit barcode on your library card and your last name. Click your name to open the Account Summary page. (See below):
On the left side of the Account Summary page, click EZ Login to open the Create EZ Login form shown below.

Note: If you do not see the EZ Login option, but instead see EZ Username and EZ Password, you already have an established EZ Login. Check with your library staff for assistance.
Type your EZ Username. Your Username is not case-sensitive and can be used with any combination of the following: uppercase letters, lowercase letters, symbols, and numbers. For example, 123456, 1luvBks!, Luv2Read.
Type your EZ Password. Your Password is case-sensitive and can be used with any combination of the following: uppercase letters, lowercase letters, symbols, and numbers. For example, 123456, 1luvBks!, Luv2Read.
Retype your EZ Password in the Confirm EZ Password box. If you type two different passwords, a message appears advising, Both password fields must match. Re-type your password in both fields.
Type your Library PIN or other requested credentials.
Click Save. A green banner displays at the top of the screen, Your EZ Login has been created. The EZ Login option is replaced with two new options, EZ Username and EZ Password. The screen changes to Change EZ Username.
Remember to log out when you have finished. Failure to log out could allow other borrowers to access your personal information. After a certain amount of time with no mouse activity, you will be automatically logged out.
Reset EZ Password
Did you forget your EZ Password? Noproblem.
Click Log In if you haven't opened the Log In to your Account dialog, and then click Forgot your EZ Password?

An entry box displays under the wording, To reset your password, type your EZ Username below.

Type your EZ Username in the entry box, and then click Submit. The system will match your EZ Username with the email you currently have on file and send you an email with instructions on resetting your password.
Note: If you also forgot your EZ Username, you will need to see your library staff for assistance. They will help you sign in with your library credentials and set up a new EZ Login.
If you have a valid email on file, a green bar displays at the top of the screen, Your password has been reset! An email has been sent with password instructions.
If you do not have a valid email on file, a message displays, An error has occurred. See your library staff for assistance. An error occurs if you have entered an incorrect Username, have an invalid email on your account, or there is no email associated with your account. Check with your library staff as a valid email is needed to reset your password.
Check your email for a Reset your password subject line.
Click the link provided in the email. This link will open the Log In to your Account dialog.
Type your EZ Username and for the EZ Password, type the password from your email notice. Click Log In.
The screen opens to EZ Password under Account Summary.
In the New EZ Password box type a new password, and then re-type your new password in the Confirm New EZ Password box.
In the Current EZ Password box type the password from the email.
Click Save. A green bar displays at the top of the screen, Your EZ Password had been updated.
You have successfully changed your password.
Change EZ Username
To login, click My Account in the upper right hand corner of the Online Catalog screen using the 14 digit barcode on your library card and your last name. After you login to My Account, click your name to access your Account Summary. (see below):
Click EZ Username on the left of the Account Summary page. The Change EZ Username dialog displays, as shown below. Your current EZ Username will be populated in the EZ Username box.

Type the new EZ Username you want to use in the EZ Username box.
Type your current EZ Password in the EZ Password box.
Click Save. A green banner displays at the top of the screen, "Your EZ Username has been updated."
Note: If you did not type the correct password a pop-up message displays, "Your EZ Username could not be updated. Please try again." If retyping does not work, see your library staff for assistance.
Remember to log out when you have finished. Failure to log out could allow other borrowers to access your personal information. After a certain amount of time with no mouse activity, you will be automatically logged out.
Change your EZ Password
To login, click My Account in the upper right hand corner of the Online Catalog screen using the 14 digit barcode on your library card and your last name. After you login to My Account, click your name to access your Account Summary. (see below):
Click EZ Password on the left.
The Change EZ Password dialog displays, as shown below.

Type the new EZ Password you want to use in the New EZ Password box.
Re-type the new EZ Password in the Confirm New EZ Password box.
Type your old EZ Password in the Current EZ Password box.
Click Save. A green banner displays at the top of the screen, "Your EZ Password has been changed."
Note: If you did not type the correct current password, a pop-up message displays, "Your EZ Password could not be updated. Please try again." If retyping does not work, see your library staff for assistance.
Remember to log out when you have finished. Failure to log out could allow other borrowers to access your personal information. After a certain amount of time with no mouse activity, you will be automatically logged out.
There are a couple different areas where you will see the Place Hold button. Holds can be placed from your search results in either List or Flow view, from Title Details or from Saved Lists.
To view a list of your holds, see Holds found in Account Activity.
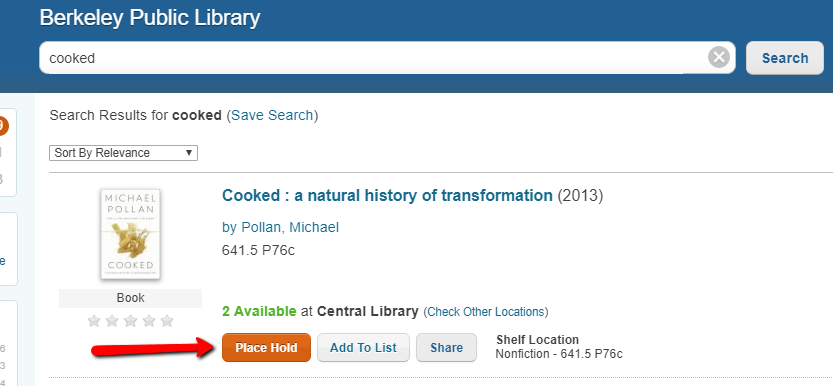
Place a Hold from Search Results
Once you have performed a search and found a title you want to place a hold on, click Place Hold for that title. If you have not already logged in, you will be asked to log in with your library credentials. See the example below for the location of the Place Hold button.
After clicking Place Hold the Place a Hold dialog displays with the Pickup Location entry box showing the location matching your login location. You may use the drop-down list ato change your pickup location for this tiem.
An example of the Place a Hold dialog is shown below with all of the possible selection options.

After making your selection, click Submit Hold.
If your hold is able to be placed, a green banner briefly displays at the top of the screen, Hold(s) placed successfully.
If your hold was not successful, a message will show the title and reason the hold was not able to be placed.
If you are unsure why your hold was not allowed, check with your library staff.
Multiple Holds from Search Results
If you want to select multiple items to place on hold, select the check box on the far right for each item. Using the Select Action drop-down, click Place a Hold.
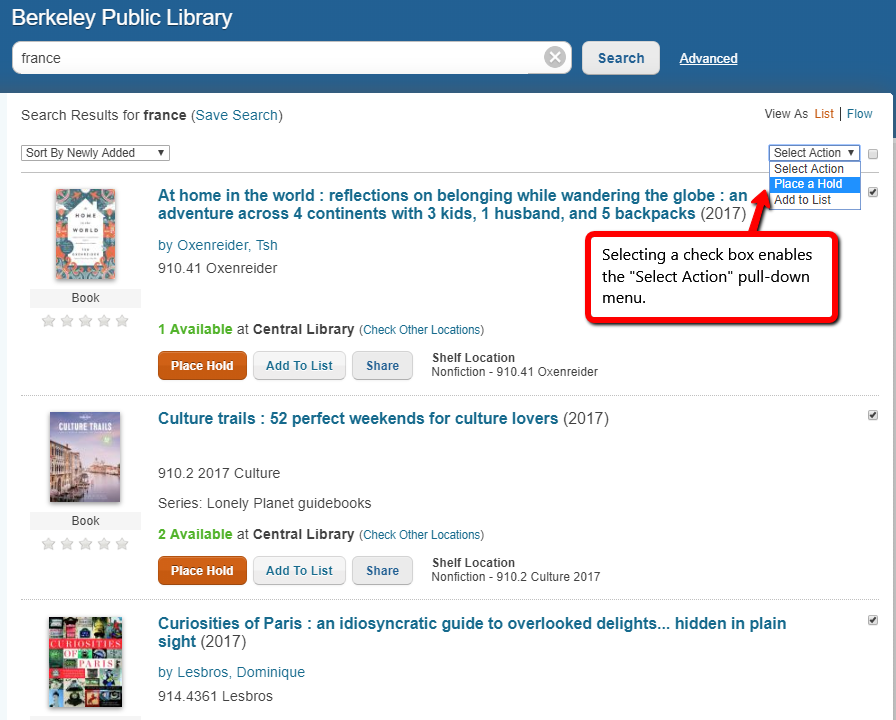
Note: Items selected from the page you are currently viewing can be placed on hold, but if you go to subsequent pages, check boxes selected from the previous page will not be retained.
A Place a Hold dialog displays with the Pickup Location drop-down list showing the location matching your login location. If you want to change the displayed location, use the drop-down list and click the location you want to use as your pickup location.
Click Submit Hold.
A Hold Feedback dialog displays which titles were able to be placed on hold, and if any of your items were not able to be placed on hold along with the reason the item was not placed on hold. If you are unsure why your holds were not allowed, check with your library staff.
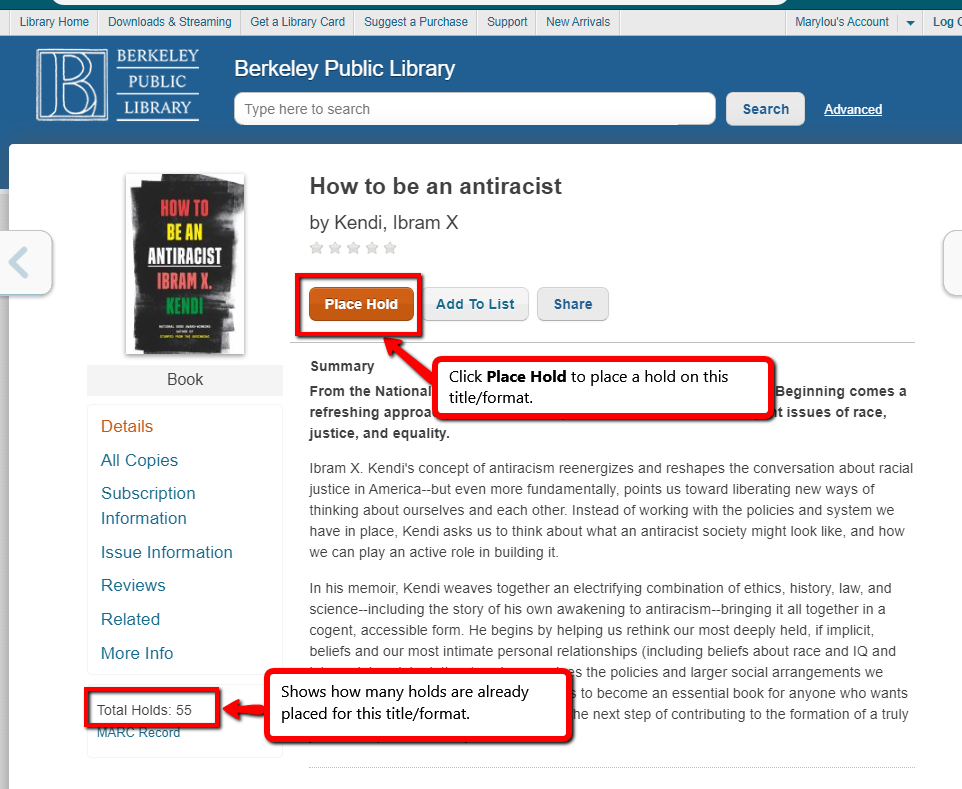
Place a Hold from Title Details
If you are viewing the title details and want to place a hold, click Place Hold. (see below):
A Place a Hold dialog displays with the Pickup Location drop-down list showing the location matching your login location. If you want to change the displayed location, use the drop-down list and click the location you want to use as your pickup location.
If your hold is able to be placed, a green banner briefly displays at the top of the screen, "Hold(s) placed successfully". If your hold was not successful, a message will advise the title and reason the hold was not able to be placed. If you are unsure why your hold was not allowed, check with your library staff.
Place a Hold from Saved Lists
If you have created any lists in Saved Lists, you can place a hold for any item on any list. After logging in click Saved Lists from the Account drop-down list found in the right corner.
Under Saved Lists select the list that contains the item you want to place on hold.
To place a hold for the individual item, click Place Hold.
To place a hold on multiple items, select the check box on the far right for each item, and then click Hold next to the check box at the top of the list.

A Place a Hold dialog displays with the Pickup Location drop-down list showing the location matching your login location. If you want to change the displayed location, use the drop-down list and click the location you want to use as your pickup location.
Click Submit Hold.
If your hold is able to be placed, a green banner briefly displays at the top of the screen, Hold(s) placed successfully. If your hold was not successful, a message will advise the title and reason the hold was not able to be placed. If you are unsure why your hold was not allowed, check with your library staff.
Place an Issue Hold
Once you have performed a search and found an subscription you want to place a hold on, click Place Hold for that subscription. If you have not already logged in, you will be asked to log in with your library credentials.
A Place a Hold dialog displays with the Pickup Location drop-down list showing the location matching your login location. If you want to change the displayed location, use the drop-down list and click the location you want to use as your pickup location.
To place a hold for the individual issue, select the check box next the desired issue and click Submit Hold.
To place a hold on multiple items, select the check box for each issue, and then click Submit Hold.

If your hold is able to be placed, a green banner briefly displays at the top of the screen, Hold(s) placed successfully. If your hold was not successful, a message will advise the title and reason the hold was not able to be placed. If you are unsure why your hold was not allowed, check with your library staff.
To login click My Account in the upper right hand corner of the Online Catalog screen using the 14 digit barcode on your library card and your last name. Click your name to see your Account Summary. (see below):
Your list of holds displays. Locate the hold you want to cancel, and click Cancel Hold. Refer to the example below.'

Note: An Arrived or In Transit Status will not display a Cancel Hold link.
To cancel multiple holds select the check box on the right for each hold, and then click Cancel Hold found on the top right next to Suspend Until. Refer to the example below.
To cancel the entire list select the check box at the top next to Cancel Hold, and then click Cancel Hold.

A green banner displays at the top of the screen, (#) Hold(s) canceled. The hold is deleted from your list.
Remember to log out when you have finished. Failure to log out could allow other borrowers to access your personal information. After a certain amount of time with no mouse activity, you will be automatically logged out.
Circulating items are automatically renewed two days before their due date. Materials, with few exceptions, circulate for 3 weeks and are allowed 2 renewals, each for an additional 3 weeks. Special and unique materials (Tools, Laptops, “Lucky Day” items, Telescopes etc.) cannot be renewed.
Materials will not renew (automatically or otherwise) if a hold has been placed on the item by another patron, or if maximum allowable renewals have already been reached. Additionally, materials will not renew if you have three or more overdue items on your account. Renewal periods begin from the due date of the item, regardless of when the renewal is initiated. Patrons may still initiate renewals through My Account, Self-Check Machines, or by interacting with a staff member.
Renew a Single Title
To login click "My Account" in the upper right hand corner of the Online Catalog screen using the 14 digit barcode on your library card and your last name. After you login to My Account, you can view your Account Activity. Account Activity contains links to your account information and lets you quickly see the status of your account, including any immediate issues on your account.
To access Account Activity from Account Summary, log in with your library credentials.
When you have logged in your name appears in the upper right hand corner of the catalog. Click your name and then Click Account Activity (See below):
Locate the title you want to renew.
Click Renew Loan.

A green banner displays a message at the top of the screen advising, "The following title(s) were successfully renewed. [selected title]." A new due date displays above the Renew Loan button.
In the example above, after clicking the Renew Loan button for the first title, the due date is updated, as shown below.

- Note: Overdue items can also be renewed. If there is a problem with a renewal, a pop-up message will advise, "The following title(s) could not be renewed: [selected title]." See your library staff regarding your library's renewal policy. You may have reached your limit on the number of renewals allowed.
Renew Multiple Titles
To login click My Account in the upper right hand corner of the Online Catalog screen using the 14 digit barcode on your library card and your last name. After you login to My Account, click your name (see below) to see your Account Summary.
To access Account Activity from Account Summary, click Account Activity (See below):
Click Loans (first item on the left-hand menu).
Select the check box to the right of the title for each item you want to renew. Renew becomes enabled. Click Renew. Refer to the example below.

A green banner displays a message at the top of the screen advising, "The following title(s) were successfully renewed. [selected title(s) listed]." New due dates display for each of the items renewed.
Not Able to Renew?
If you tried to renew a title and get the message: "Item cannot be renewed at this time", consider these possibilities:
- Another borrower has placed a hold on this item.
- You have reached your maximum number of allowed renewals.
- The expiration date of your library card has expired.
- Fines are due on your account and renewals have been blocked.
Contact library staff for assistance if you are not sure why you could not renew the selected item.
Availability is displayed based on your login location. This is helpful if you are logging in to the catalog from outside the library (home, office, mobile app, etc.) and want to see if an item is available. You will be able to see the availability of ebooks in OverDrive in the search results. Check out What to Look for in the Search Results for more information on e-resources. Information on where to look for what's available and what's not is discussed below:
Availability in Search Results
The following example displays search results for 'grilling'. The local location is Central. Notice each search result advises whether the item is available at Central and provides a link to Check Other Locations.

In the example above the first result displays 1 Available at Central and provides Find on shelf information. This means the item is available at this location and with the Find on shelf information (the collection and call number) you will be able to locate the item on the shelf in your library.
The second result displays No Copies at Central Library. This means there are no copies available at the Central location, but if you click Check Other Locations you will be able to see what other locations have the item. Clicking Check Other Locations opens All Copies, showing the other locations where you can find the title, as shown below. (NOTE: If you have limited your search by branch, you will only see information about items at those branches.)

The third result displays Not Available at Central. This means the item is currently out at Central, but you can click Check Other Locations to see what other locations have the item.
If your library does not have the local location set up to see availability, you will see a View All Locations link, as shown below. In this example your library may or may not have the item. You will need to click View All Locations to see what location has the item.

Availability in All Copies
You can always check for availability in All Copies. Click the title from your search results, and then click All Copies on the left side. All Copies shows all of the locations that have a copy of the title along with whether the title is available or not. Refer to the example below.

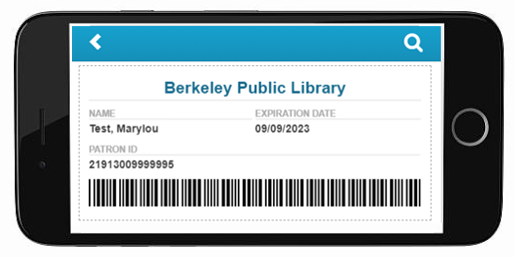
You now have the option to view and save a digital version of your Library Card.
Log into My Account with your library credentials on your mobile device.
Tap on View Library Card.
Your library card will display and can be scanned at self-checkout machines and at service desks by library staff.
Searches - Saved Searches
You can view, re-run, rename or remove your search in Your Account , Saved Searches.
To view your saved searches, start by clicking My Account in the upper right hand corner of the Online Catalog screen using the 14 digit barcode on your library card and your last name. After you login to My Account click your name.
Click Saved Searches. (See below)

All of your saved searches are listed, with the total number of saved searches shown at the top in parentheses. There are four columns containing information about your search.
Search Name is the name you gave your search.
Search Criteria is the term you used in searching.
Sorted By indicates how your results were sorted before you saved them.
Date reflects when you saved your search.

The lists are initially displayed with your latest saved search on top.
Use the Sort By drop-down list to change the order of the list. You can sort by Name, Date Created, or Last Update.
Click any search name to re-run the search and view the individual records associated with the search results. If you saved it in a particular view, the search will display in the same view. For example, a search saved from the Flow view will display in the Flow view.
If you want to get RSS updates, click the RSS icon to add the URL to your RSS Feeder.
Remember to log out when you have finished. Failure to log out could allow other borrowers to access your personal information. After a certain amount of time with no mouse activity, you will be automatically logged out.
Searches - Remove a Search
Log in with your library credentials. Use the Account drop-down list and click Saved Searches.
Locate the search name you want to remove.
Click Delete. An Are You Sure? pop-up displays.
Click OK. The search is removed and a message displays in green at the top of the screen, 1 Saved search(es) deleted.
To remove selected saved searches, select the check box for each search you want to remove.
Click Remove found at the top right of the check box.
A message displays in green at the top of the screen, XX [number of searches selected] saved search(es) deleted.
To remove the entire list, select the check box on the top right. All of the check boxes will be selected and Remove is enabled.
Click Remove. A message displays in green at the top of the screen, XX [number of searches selected] saved search(es)deleted.
Searches - Rename a Search
Log in with your library credentials.
Use the Account drop-down list and click Saved Searches.
Locate the search you want to modify.
Click Rename. A Rename your saved search dialog opens with the name highlighted.
Type the new name for your search, and then click OK.
A message displays in green at the top of the screen, Saved Search renamed.
Advanced Searching Tips
To optimize response time, limit your search fields to five or less.
Choose between any of these or all of these if you are searching multiple fields. The terms will be searched as 'OR' for any of these and 'AND' for all of these.
Your selected search criteria will remain in the Advanced Boolean Searching form even if you return to using the Search box. This includes any selected locations you might have set up.
Set up Advanced Search
Click Advanced next to the Search button to open the Advanced Boolean Searching dialog, as shown below.

All locations in your network will be searched.
If you want to search specific locations, click (change) next to Searching all locations, as seen above. A Select Locations to Search dialog displays.
Select the check box for each of the locations you want to search, and then click Save.
The heading will reflect the number of locations you have selected; for example, Searching 3 locations.
Choose between 'any of these' or 'all of these' for the search terms you are about to enter. The default selection is 'all of these'.
Using 'any of these' will search for 'this term' OR 'that term'.
Using 'all of these' will search for 'this term' AND 'that term'.
Choose from the first drop-down list Any Field, Title, Author, Series, Subject, Note, Tag, ISBN, or UPC.
Choose from the second drop-down list, depending on your selection from the first drop-down, begins with, exactly matches, contains, or does not contain, as selections will vary based on your first selection.
Consider the following:
'begins with' acts as a multiple character wildcard.
An author search for King may return: King, King-Smith, Kingston, Kingman, Kingsbury, etc.
'exactly matches' limits your results precisely to your term.
An author search for King will return only results for the singular name King.
An author search for King, Stephen will return only results for the author, Stephen King.
'contains' means the term can be found anywhere in the selected field. For example, an author search for King will result in King, Stephen along with other King variations such as King, Jonathan, King, Deborah, King, Laurie R, etc.
'does not contain' means you do not want the term to be returned anywhere in the results. For example, an author search 'begins with' King, but 'does not contain' Stephen, will return all variations of authors beginning with 'King' but not displaying 'Stephen King' in the results.
Type your search term in the entry box.
Use the second set of drop-down lists if you want to narrow your search further.
Click the plus sign to add additional parameters and repeat steps 4 and 5.
When you are satisfied with your search criteria, click Advanced Search to search for your term. The search results display.
If you are not satisfied with your results, click the Advanced link and revise your search terms. Your existing terms will remain on the form until you clear them.
Use the minus sign to remove any of the search parameters.
If no results are found for your search criteria, the message displays, No search results found.
To return to regular searching, type your search term in the Search box in the header.
Viewing Saved Lists & Placing Holds
After you have created lists of items in the catalog, Saved Lists provides several options:
- View your lists
- Place holds
- Set up an RSS link to always have continuous updates to your list
- Rename your list
- Delete items from your lists
- Delete the entire list
- Print your list
- Print a bibliography, rate, or review
- Share your list with someone on social media or email via a link.
Working with lists:
To login click My Account in the upper right hand corner of the Online Catalog screen using the 14 digit barcode on your library card and your last name. After you login to My Account, click your name to view your Account Summary. (see below):
Click the Saved List tab (See below). Under Saved Lists all of the lists you have created are shown on the left. The first list will display with the associated items. Click the name of the list you want to view.
This shows three lists, as seen on the left. The first list name, Crafting, shows there are four titles saved to the list.
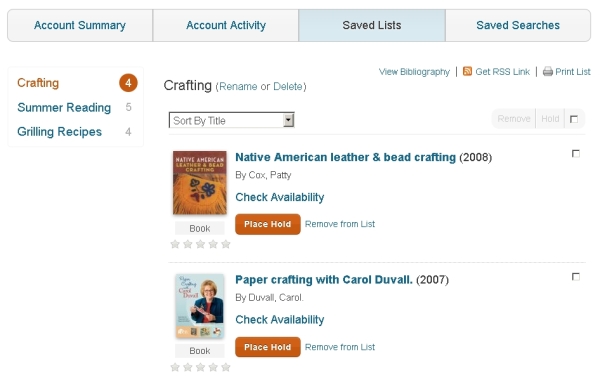
The list displays with the associated items sorted by Title. (Titles starting with The, A and An are ignored; for example, The Big Green will be sorted by 'B' for Big.)
- Use the Sort By drop-down list to sort by Title, Author or Publication Date.
- Click the title to view Details for the selected item.
- Click Back to Results to return to Saved Lists.
At any time you can place a hold for an item on the list by clicking Place Hold. To place holds on multiple items, select the check box on the right for each item, and then click Hold next to the check box at the top of the list. If you want to place the entire list, click the check box next to Hold to select all of the items on the list, and then click Hold.
Lists - Get RSS Link
To add a RSS feed to your saved list and get continuous updates to your list, log in to My Account with your library credentials. After you login to My Account, click your name to view your Account Summary. (see below):
- Click the Saved Lists tab.
- Click the name of the list you want to subscribe.
- Click Get RSS Link found at the top right above the list name.
- Proceed according to your browser specifications for handling RSS feeds.
Lists - Delete Individual Items on a List
Log into My Account with your library credentials and click your name to view your Account Summary (see below):
Click the Saved Lists tab.
Click the name of the list containing the items you want to delete.
To delete an individual item, click Remove from List for each item you want to delete. A green banner displays at the top of the screen, "1 item(s) have been deleted."
To delete multiple items select the check box to the right of each item. Click Remove found on the right across from the Sort By drop-down. A green banner displays at the top of the screen, "[#] item(s) have been deleted."
Note: If you remove the last item on your list, the list name will still remain in Saved Lists. You will need to delete the list name to remove the entire list. See Delete a List for instructions.
Lists - Delete a List
Log into My Account with your library credentials. Click your name to see your Account Summary. (See below):
Click the Saved Lists tab in your Account Summary.
Under Saved Lists all of your lists you have created are listed on the left. Click the name of the list you want to delete. The list displays with its associated items. Click Delete found next to the title of your list.
An "Are You Sure?" pop-up displays, Click OK to delete the selected list. A green banner displays at the top of the screen, "1 list has been deleted."
Lists - Print a List
Log into My Account with your library credentials. Click your name to see your Account Summary. (See below):
Click the arrow to open the drop-down list of Account Options, and then click Saved Lists.
If you have more than one list, click the list name on the left for the list you want to print.
Click Print List found on the right. A pop-up displays the selected list name and related items. RSS feeds with not display or print.
Click Print. Proceed accordingly with the Print dialog associated with your browser.
Tip: To View/Print Bibliography (MLA Format), click View Bibliography found at the top right above the list name. A pop-up displays with the Bibliography list containing all of the items on your list with the exception of RSS feeds. Click Print if you want to print a copy. Proceed accordingly with the Print dialog associated with your browser.

Lists - Rate/Review from Saved Lists
You can rate any title on your list by holding your mouse pointer over the stars until you have highlighted the rating you want to give.
Click when you are satisfied with the rating.
A green banner displays at the top of the screen: "Your rating has been saved." A "Would you like to write a review?" link also displays. Click the link if you want to also review the title.
Lists - How to Email Your List
If you would like to share the list you have compiled with your friends or family, or just email a list to yourself, click the Email List link found on the right side above the list name under Saved Lists in the Account Options.

The Share This List pop-up displays, as shown below:

In the first entry box type the email address(es) of whomever you want to share your list. If you are sending your list to multiple addresses, use a comma between each address. Make sure your email is in the correct format: name@domain.com.
In the second entry box type a message to go along with your list. This is optional. The message will display in your email before the items in the list.
Click Send. A confirmation green banner displays, "Your list has been sent."
Note: You can only email one list at a time.
Lists - Rename a List
After you login to My Account, click your name to view your Account Summary. (see below):
Click the Saved Lists tab.
Under Saved Lists all of the lists you have created are listed on the left. The first list displays with the associated items.
- Click the name of the list on the left you want to rename.
- Click Rename found next to the title of your list.
- The New List Name dialog opens with the current list name displayed in the New List Name box.
- Type the name you want to use in the entry box, and then click OK.
- A green banner displays at the top of the screen, "Your list has been renamed". The new name shows in your list of lists.
What's Needed to Download
Internet access - Your library will have internet access to connect to the e-book/e-audio provider when you are in the library. You will also be able to access your library's catalog via your home computer and download from home.
Your library credentials - When you are asked to provide a Username and PIN/password, use your library credentials. Your library, as the subscriber, will be recognized by the e-resource provider. You will also need to establish a username and password with the e-resource provider when setting up your account.
'Download' software - Your library accesses their e-resources through different providers, such as OverDrive The software you need to get started depends on your device and the type of download (digital, audio, PDF, etc.). See E-book Basics for more information on getting started.
Ask your library staff to assist you if you have any questions about what is needed to start reading e-resources.
What to Look for in the Search Results
In your search results you will see the item's availability and how many copies your library has, along with how many others are waiting for the item, when applicable. In some cases you will be able to place a hold, cancel a hold, and view your holds and checked out items from the Account Activity area. The different options for availability are discussed below.
- [#] Available - This shows how many copies are available to download. In this example the library has one copy available to download now. Click the Download button and follow the instructions provided by the e-resource provider. How to download is discussed later in this topic.

- Always Available - This option means there will always be a copy in your library to download. Click the Download button and follow the instructions provided by the e-resource provider.

- Not Available [#] Borrowers waiting on [#] Copies (More options) - This option shows all of the copies in your library are currently 'checked out'. Click the More Options button and you will be taken to the OverDrive site which will allow you to place a hold on the item using your library credentials.
- Not Available - This title is scheduled to release on [date] (More options) - This means the title has not been released yet, but a hold can be placed for when the item arrives. Click the More Options button to connect to the OverDrive site where you can place a hold using your library credentials. You will also be able to see how many others have placed holds.

If OverDrive is unavailable (the site goes down), the search results will no longer show the item's availability. The search results will display Downloadable with a More Options button. Clicking More Options may allow you to still connect to the site. If you get an error message instead, try again later to access the e-resource you want.
The search results may show Downloadable with a More Options button, as seen in the example below. Clicking More Options will redirect you to the provider's site, such as Hoopla which will display the availability of the item.
How to Download
- Perform a search for the e-resource you want.
- Look for search results displaying a Download button. Under the book jacket the format will display as eBook, eAudiobook, Electronic Resource, etc. Some results will also display 'Downloadable', as shown in the example below. This helps to easily see which of your search results are electronic resources.
- Click the Download button. You will be redirected to Overdrive to continue the download process. Since there are different providers follow the instructions for the device you are using for e-resources.
- Select the format that you would like to download. This option may not be available, depending on your library's holdings.
- If this is the first time you have ever downloaded, additional software will need to be installed to be able to access the title. See E-book Basics for more information.
- Once the e-resource is downloaded to your device you will have an allotted time to read the e-book or e-Pub, or listen to the e-audio. If you finish reading your e-book or listening to your e-audio before its due date, you can always delete it from your device.
- If you have placed an e-resource on hold, you will receive an email notice when the item becomes available. You will be given an allotted amount of time in the email to download the title to your device. If you do not download in the allotted time, the hold will expire and you will need to place another hold on the item if you are still interested.
- If you are able to check out and place holds for the item, you will also see a Download or Place Hold button. This will allow you to complete the download process without leaving your library's catalog. If you are downloading for the first time, make sure you have set up the proper accounts for the format you need. See E-book Basics for more information.
You can change your email address, phone number, or cell-phone provider (to receive text messages from the Library) on the Online Catalog. In order to change your home address, you must present proof of address to a Library staff member at a service desk at any of our five locations.
To change your email address, start by logging-in. Click your name to see your Account Summary. (See below):
Click the Contact Information option to open the Edit Your Contact Information form (below):
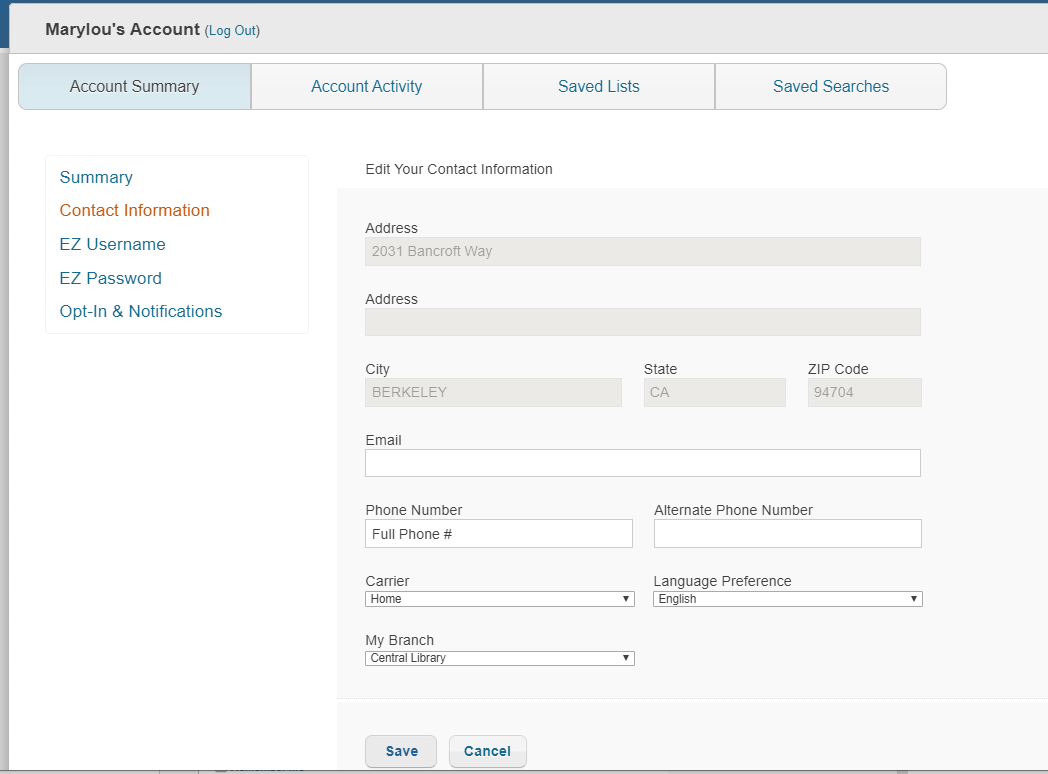
Make changes to your information. You can change your, email, phone number, alternate phone number phone carrier, preferred language, and/or preferred branch. (Bring proof of your current address with you next time you visit the library in order to change your address.)
Click Save.
A green banner displays at the top of the screen, "Your information was saved."
Remember to Log Out when you have finished. Failure to log out could allow other borrowers to access your personal information. After a certain amount of time with no mouse activity, you will be automatically logged out.
Opt-In to Loan History
You will have the option to opt-in to have their Loan History Retained and Displayed.
Log in with your library credentials. and then click Your Name to access your Account Summary. (See below):
Click Opt-in & Notifications on the left.
To opt-in to have your loan history retained and Displayed, check the box next to Save my loan history and click Save. Confirm your selection in the resulting dialog box.
Note: Loan History will be displayed in the Account Activity area and will include titles checked out after you opt-in. If you should choose to opt-out later, your Loan History will be removed, and will not be recoverable by the library.
Text Message Notifications and Email Receipts
We now offer text Message Notification options and/or Email Receipts for Charge and Renew. You will have the option to opt-in for individual SMS or Receipt options.
Log in with your library credentials. and then click Your Name to access your Account Summary. (See below):
Click Opt-in & Notifications on the left of your Account Summary..
To opt-in to receiving SMS text messages for Due Date reminders or hold notifications check the tick box next to the appropriate option. Note: A phone number and text-able phone type (i.e. not Work, Home, Cell – No Text) are required to select SMS options.
To opt-in to receiving email receipts for checkouts and renewal check the tick box.
Note: A valid email address is required to receive email receipts.

Click the "Suggest a Purchase" link in the top menu (see below).

This pulls up the "Suggest a Title Form" (below)

We welcome your suggestion. If we own or order an item you suggest, we will place a hold on it for you. Please check your account to track suggested purchases. We are unable to place holds on digital items (eBooks and eAudiobooks). Please check the catalog for these items.
We suggest limiting suggestions to titles already published. The Library generally pre-orders a very wide range of titles. You can search our catalog to see if your suggestion is something we already own.
Due to the volume of requests we cannot purchase every suggested item and we cannot notify you if we do not order an item you suggest.
Rate a Title
You can rate a title at any time by highlighting the number of stars you feel the title deserves using whole stars and half stars. You can rate without logging in, but if you want to write a review, you will be asked to provide your library credentials.
Meaning of Star Ratings

Places Where You Can Rate
Rate your title from any of the following areas:
- Search Results
- Details
- Saved Lists
- Account Activity
- Loans
- Holds
- Loan History (if available)
How to Rate
- Hold the mouse pointer over the stars to color the number of yellow stars you want to give for your rating. The star's meaning displays as a tool tip; 3 stars is Average.
- Click when you are satisfied with your rating.
- Note: If the title has already been rated, move the mouse pointer over the stars to add or subtract stars. Click when you are satisfied with your rating.
- A green banner displays at the top of the screen, Your rating has been saved.
- At the same time a pop-up asks, Would you like to write a review?
- Click anywhere to bypass the review.
- Click the link to open the Add New Review dialog and write your review.
How the Stars Add Up
When you first rate an unrated title your ranking displays immediately. As others start to rate the same title, the stars are averaged together. An item with two ratings (five stars and two stars) will show the average (3.5 stars). If you write a review (which requires a rating), the stars will be updated upon approval of your review.
Search for the title you want to review.
After your search results display, click the title you want to review to display the title details.
Click Reviews. If any borrower reviews have already been written for the title, the reviews will display under the Borrower Reviews heading.

Click Add New Review. The Add New Review form displays.
Complete the form as follows:
Rate This Title *: Place your mouse pointer over the stars to rate the item. The stars' color changes to yellow with a tool tip displaying the meaning of the rating. The stars meanings are as follows: 1 = Bad, 2 = Poor, 3 = Average, 4 = Good, 5 = Awesome.
Title of Your Review *: Type the title of the review you are going to write. You are allotted up to 40 characters. This is NOT the same as the title of the book, but your own creation.
Your Name (optional): Type your name or the name you want to use as the reviewer of the item. This is not a required field.
Write Your Review *: In the entry box, type your review. You are allotted up to 10,000 characters.
Note: In order to successfully submit your review all * (required) fields must be completed. Failure to enter information in any of the three required areas will result in an error message requesting the missing.
Tips for writing your review
Focus your review on the item.
Be clear and concise.
Describe your personal experience on whether you liked or disliked the item and why.
Provide other readers with a taste of the plot, but do not give away surprises, especially the ending of the story.
Do not use offensive language or profanity.
Do not add contact information.
Do not include html, javascript, css, or images
After you have completed your review click the Submit button to post your review. After you click Submit, a green banner displays at the top of the screen, Thank you for submitting a review. Refresh the screen to see your review. Reviews are sorted by a timestamp; therefore, newly submitted reviews will appear at the top of the list of reviews
If a message displays advising, Thank you for submitting a review. Your review will be posted upon approval of library staff. then your review will post once it is reviewed. You will not receive a notice when the review is actually posted.
If you change your mind about posting your review, click the Cancel button. However, once you click Submit you cannot delete or edit your review.
Write a Review after Rating
If you have just rated a title, a Would you like to write a review? link displays. Click the link if you want to write a review.
You will be asked to log in with your library credentials if you aren't already logged in.
The Add New Review dialog opens. Your rating will be displayed.
Complete the form.
Tagging is the process of assigning personal keywords to items which assist in locating relevant material at a later time.
Add New Tag
From your search results page, click a title to open the Details page. Click the Add New Tag button found in the lower part of the title details. If you are not already logged in, you will be asked for your library credentials.
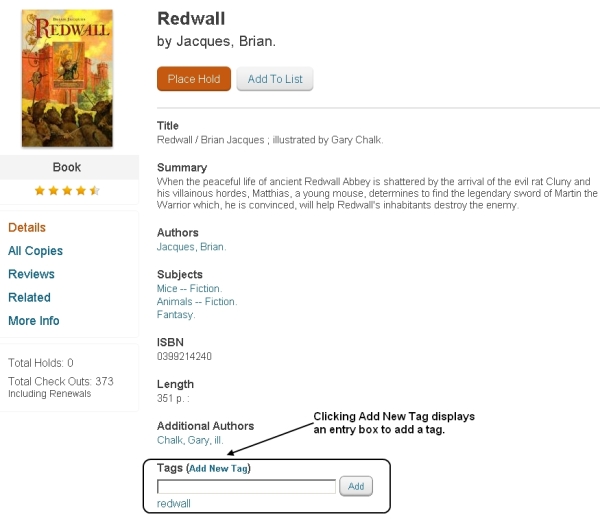
Once logged in an entry box displays as shown in the example above.
Type a term relevant to the result and click Add.
The term is immediately added under the Tags area. Tags are displayed in the order they were entered. The latest dated tag shows first.
Search Using Tags
After adding your own tag, you can later search for the item using the tag you created.
In the Search box type: tag: "[whatever tag name you used]" using all lowercase letters. The search will return items with the same tag.
In the example shown above, you would type tag:redwall to display all of the items tagged with 'redwall'.
When logged into My Account using your mobile device, you will be able to see your account activity, as well as make some changes to your account information.

Loans
View or Renew your current loans.

Holds
View and manage the title that you have on Hold. By selecting Hold Options, you can Suspend your Hold to a later date, Change the Suspend Hold Date or Re-activate your Hold, Cancel your Hold, or Change the Pickup Location for your Hold.

View and Pay Fines
View and pay your outstanding fines and fees online.

Saved Lists
View your saved lists.

Change Your Contact Information
- Log in with your library credentials by selecting My Account and then Sign In using the upper left navigation menu displayed on your mobile device.
- Once logged in, select Contact Information from the My Account options.
- Edit the appropriate fields and select Save.. Please note, some fields are not available for editing.

4. A confirmation screen will appear.
Mobile Locations & Hours
If location services are enabled on your mobile device, the library branches will be displayed in order of proximity, with the nearest branch listed first. If you are logged into My Account, your preferred branch will display first and additional branches will then be listed in order of proximity, from nearest to farthest. Additionally, a link to directions via Google Maps navigation will be available. To sort results by distance, select the Nearby tab. To sort alphabetically, select the A to Z tab.
If location services are not enabled on the user's device, branches will be displayed alphabetically.
Opt-in & Notification Options
You may opt-in to have your Loan History Retained and Displayed.
- Log in with your library credentials by selecting My Account and then Sign In using the upper left navigation menu displayed on your mobile device.
- Select Opt-In & Notifications from the My Account options.

- To opt-in to have your loan history retained and Displayed, turn the toggle to On. You will be presented with a confirmation dialogue box asking if you want to Continue or Cancel. Selecting Continue will save your setting and your loan history will be saved.

Note: Loan History will be displayed in the Account Activity area of My Account in the desktop view and will include titles checked out after you opt-in.
-
If you would like to opt-out, and no longer have your loan history retained, turn the toggle to Off. You will be presented with a confirmation dialogue box asking if you would like to Continue or Cancel. Selecting Continue will remove your loan history, and it will no longer be saved.
Text receipts:
You will have the option to opt-in for individual Text or Email receipt options.
- Log in with your library credentials by selecting My Account from the navigation menu displayed on your mobile device.
- Select Opt-In & Notifications from the My Account options.
- Turn the toggles to On or Off based on your preferences for each notification. This action will automatically save your preferences.
If you haven't found the information you are looking for here, please ask Library staff at any location for assistance, call us or contact us online. We are here to help!